
A Polish Winter – January Update
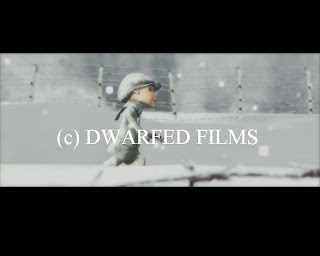
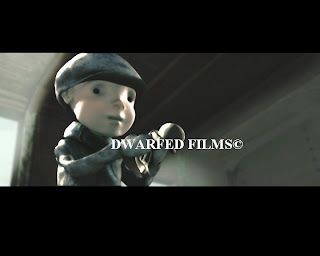
Here are some new images from the Holocaust-themed short animated film “A Polish Winter”.
The first shows the lead character – a young boy - walking through a snowy landscape.
The second image is a composited image that shows a previously seen image of the boy – except this time with background, lighting effects and colour grading applied
Colour Grading and Compositing
The most time consuming aspect of this film is (once again) the rendering of separate layers and passes which must then be composited together in order to achieve the final image ‘look’.
I personally love the ability of being able to alter and grade each shot in this way but it does tend to get very monotonous filing away every single frame of animation in particular folders rather than having to deal only with only a few thousand fames instead!
‘Grading’ is what gives a film’s images a particular ‘look’.
That could involve a desaturation of the films colours to give a more grey-tinged hue or could involve dong the opposite and increasing the saturation of particular colours in the movie to give it a more extreme look.
I prefer the look of strong light and dark tonal qualities, which emphasises the highlights and shadows of an image. It helps create a visual unity of each still image while at the same time making the character blend better with his surroundings.
I also don’t like the ‘plastic’ look of 3D animation and try as hard as possible to avoid this. I hate surfaces looking too shiny and perfect.
Another ting is depth of field: unlike reality, in the computer world it has to be faked. Also, in the natural World, colours need to integrate as a unit, rather than stand out on their own (unless it’s a deliberate effect). I find that reducing saturation levels, and compensating for a washed out type image by upping the contrast, really helps blend a shot better and make it seem less ‘computery’ looking. It’s not about making photo-realism – and the cartoonish-styled “A Polish Winter” is never gonna have to worry about that – but an attempt to make an obviously false World seem more ‘real’ and tangible.
It’s amazing how much time is spent trying to create an ‘imperfect’ image!
It’s amazing how much you can alter a films look in the colour grading stages: a sequence that seems pretty uninteresting can be immediately given new life and excitement by simply altering the colour levels and contrast settings.
Grading is mostly used to ensure a flow of sequences blend seamlessly.
Lighting animation is similar to real world lighting in that what looks ‘right’ from one camera perspective, may not look so good (or indeed, look terrible!) from another viewpoint.
On “A Polish Winter” I would set up the lights for each particular camera view and then have to alter each one in order to ensure nothing ‘weird’ happened: for instance, the character being light with a bright light from the left hand side suddenly is lit from the right side in the following shot.
Sometimes this is done on purpose when I want to create a highlight along one side of the character’s face when in partial silhouette, so as to separate him from the background (they do this all the time in Hollywood movies and TV shows like CSI). But when I’d cut to the opposite viewpoint I’d switch the highlight to the characters other side. This wouldn’t happen in real life but it’s an age-old filmic convention going back to the early days of cinema. It just looks good!
But with animation you can’t predict what way the entire animation sequence will look until it’s been rendered, so occasionally you might find that the highlight you set up for that character doesn’t work so well because the figure moves at angles that obscure the effect.
It’s moments like these that you sometimes need to get a bit creative in the grading department!
Altering contrast on particular colours can create artificial highlights. You can also create a glowing white-coloured mask of the character that you composite with the original footage in order to separate the figure from the background.
Making Snow
Because the film takes place in a snowy setting, our software of choice Blender 3D must calculate large amounts of particle data.
In one 500-frame sequence the storage space needed just for the baking of particle data reached over 2 gigabytes!
Side Note:
Just this morning I received another external portable storage device, which is mainly to cope with archiving all the files needed to make an animated movie.
Unfortunately the Western Digital device I got didn’t see to want to work on Windows Vista so I spent a bit of time looking up solutions on the Internet and trying to locate device drivers.
Eventually I got Vista to recognise it but then I noticed that this 320 Gig portable drive was formatted to the older-style FAT32 filing system which limits the amount of individual file sizes!
It took about 5 hours (yes, 5 hours!) for Vista to reformat the drive into NTFS format.
A previous Western Digital portable drive we were using worked immediately out-of-the-box so I can’t understand the issues with this newer disc.
Using Baked UV Maps to Cheat!
I’ve tried to cut back on long render times by baking textures quite a lot.
For instance, the snowy ground plane has had its textures and shadows baked into a UV map. This allows me to apply a shadeless UV mapped material to the ground that doesn’t need to use of valuable rendering time as the textures and all-important shadows are already there.
The main exterior scene area of the film is surrounded by barbed wire fencing that was originally modelled and designed as 3 dimensional meshes.
This seriously ate up CPU, so instead I created a UV mesh of barbed wire and fences, then baked shadows and lighting onto these UV’s. Then I applied these pre-rendered UV maps to simplified meshes and planes in the scene to replace the original complex models.
The result? Faster rendering and the ability to visualise camera moves in the 3D view port more efficiently.
‘Cheats’ and ‘tricks’ like rendering baking often take up a lot of time to set up in the first instance but pay off in the end.
Mixing a combination of baked texture planes in the background with fully modelled 3D objects in the foreground works very well.
Remember that the final image will be viewed as 2D, regardless of the fact that it was once a 3D object!
Baking textures and shadows onto meshes also helps prevent horrible flickering during playback of animated frames and can also allow you to create more complex and detailed multi-layered textures (you can edit the baked textures in The Gimp/Photoshop as much as you want and then drop it back into your scene to see how it looks).
Music Composing
We’ve also scored the main theme music from the film.
Mostly performed on harsh violin and cello, the sound is then distorted with heavy reverb. Other VST effects are added to the mix to boost the low end and liven up the mid-tones.
It’s haunting and really adds to the poignancy of the themes of the film.
More images and details about “A Polish Winter” will be added to the site soon.