Search This Blog

Sunday, August 14, 2011

5 Random Thoughts on Movie Making


As I am trying to piece together our first feature film, I started to think about what I've learned/taken from the short films I've made over the years and how I can put that in use on a full length feature.


1: Make sure the effort is worth the wait.
When I first started making movie's I began with a borrowed video camera from school that I messed around with while making a stop-motion animation. I can't remember what the film was called. I can't even remember what it was about!
All I really remember is the massive size of the camera and tediousness of manipulating inanimate objects around a tabletop one frame at a time. It was mind-numbingly boring work but it taught me something important: if you're gonna spend a lot of time on something make sure the final product is worth it!

2: Choose a medium that suits your goal.
I started in classical animation (the drawn on paper stuff) and this was mainly becasue I liked watching cartoons as a kid. I was also pretty good at drawing.
But being able to draw doesn't mean you can animate!
I hated classical animation with a passion.
This was way worse than the stop-motion 'experiments' because you had to physically draw a 3-dimensional object on a flat 2-dimensional plane...and make it seem believable.
This was waaaaaay too much for my attention span to cope with.
2D animation was not for somebody like me.
I realised that live-action would probably be a better bet to enable me to display what I wanted to show. I alter wet back to animation (the 3D kind) when I felt that live action didn't suit the topics and style I wanted to pursue at that time.
Just use the medium that suits the project .

3: Use what you've got.
Live-action film-making requires expensive equipment and a crew. Well that's what some people seem to think. I think otherwise.
When I started messing around with live-action films I used what I could get my hand son: a TOMY black and white toy camera.
It connected to a TV by a 15ft cable (which meant you could only film within 15ft of the telly) and recorded to your video recorder.
The sound recorder was the camera, and if you stood more than 6ft away you couldn't be heard.
This sounds limiting but in reality it forced you to make choices about what you could film and how you could film it.
Limited choices are good. Too many choices make you waste time thinking about your options. When you have no optns you just get on with it!
Editing was done in camera. You filmed in sequence. Occasionally I got more 'extravagant' and hooked up two video recorders and recorded what was previously 'filmed' on one tape back to a different tape. This allowed me to rearrange sequences and also to add music and effects.
Ah yes, music and effects.
Let me tell you about this: I used the SONY PLAYSTATION and a copy of the 'game' MUSIC to create the soundtrack. This I recorded onto a cassette tape (there was no way for me to record the music directly out from the PLAYSTATION). Then I would play back the tape cassette as it was pressed up against the TOMY video camera's little microphone as it recorded using the previous 'dual video recorder' set-up I spoke about earlier.
I had no money and no way to get my hands on 'proper' equipment like the 'professionals' use.
So what?! Use what you have and make the most of it.

4: Plan carefully but be ready to scrap your plans.
Anything that can go wrong will go wrong. It's an old saying but it's true. In fact you could add to that: 'anything that can go wrong will go wrong...and even worse will happen on top of that!'
Everything from locations, crew, actors, equipment, weather will most likely let you down in some way.
It's just the way things work. You therefore set out form the beginning with a plan of action of what to do in the case of a disaster happening.
I remember on a short film I made that I went around looking for a particular location that I needed. I knew one which was written into the script. I had used it before many times with no problems with. I had filmed there in a guerilla style (no, not wearing a monkey costume) without the owners knowledge. This time I decided to ask for permission because I knew I'd spend a few hours in the place. Well, I asked and was sent on a wild goose chase to get forms for insurance and all sorts.
I shouldn't have bothered. This really messed up things. I had written the script with that exact location in mind for the express reason that I was sure I could get it. I thought I'd planned things out but I had instead put all my eggs in one basket.
I eventually found a far better location and it cost me the grand total of....a box of chocolates.......and that was expensive by my humble standards!
But the process of being refused the location I have banked on messed up my time and forced me to scramble. When you scramble you make mistakes. That's not good.
I had storyboarded the movie based on the previous location. Anyone who knows me will know that I storyboard shots quite a lot. But since the experience of losing that planned location I no longer cling to my storyboards like I once did.
Storyboards are a blueprint. They are there to give you ideas or try out ideas. I use storyboards for inspiration but then shove them back in my pocket and do what seems right at the time. What looks good on paper doesn't look as good in reality.
So my point is (after the long-winded talk that has gone before!) is to think things out as best you can but always ALWAYS!) be prepared to toss those plans in the bin and move on with another plan.

5:Don't just do what 'they' do.
First of all who are 'they'? 'They' are the so-called 'professionals', the ones you see with the fancy equipment and the big budgets. When 'they' make a movie it is like a military operation; and like a military operation everybody has a particular role that they must stick to or everything comes crashing down.
Low budget film-makers are not trainee 'professionals'. If you make a film, no matter how short or seemingly insignificant, you are a film-maker. Just felt like I had to get that out of the way.
The thing is, 'they' have set practices for the way things are down. the majority of these things are set in stone based on the previous experiences of movie-making down the years. Every so often somebody new comes along and adds another little trick to add to the list of established routines and procedures that the professionals use.
Which is good, but when something stops being new and becomes merely a procedure it loses its charm. The people who decided it'd be cool to release mainstream movies using handheld 'wobble-cams' were probably seen as wacky but now that they process is overused it beocmes annoying.
I'm personally sick and tired of hearing some movie being promoted as 'gritty' simply because the camera is moving about like a spastic monkey.
Low budget or real independent film makers shoul''d borrow some of the techinques and practices of the mainstream 'pro' lot...but not just go crazy copycatting fancy crane shots or whatever.
A perfect example is the crazy idea of low budget film makers spending a load of money on making their 'prosumer' camera look more 'professional'. A big fancy matte-box stuck on the front of your camera may make you look 'cooler' to those passing by but I don't see how it helps in any to make the actual film any better.
Are people gonna sit and watch your movie and comment on how wonderfully professional your matte-box looks? No. Because they won't see it!
If it doesn't make the film any better then it serves no purpose (unless you really need a big fancy matte-box becasue you are filming your movie entirely in a permanently brightly-lit area...like the SUN).
The same goes for crew. If you don't need a clapper-board person then why have one. Do it yourself if you can. Or get one of the actors to do it.
If you are obsessed about having a long list of credits at the end of your movie just like a 'real' film then invent a bunch of names and shove 'em on at the end credits!
I did that once a long time ago and I still cringe at the thought. Why? Because nobody cares! nobody reads the credits apart from the people who worked on the film, and I seriously doubt your imaginary crew will be too worried about seeing their names on the silver screen.
Independent film-makers need to be what they are: independent. Copy the good things that mainstream film-makers do but be aware that you are not mainstream. Play to the independents strengths of freedom and speed: get the shot and get out of there.


Well that's all I have to say for the tie being but I'm sure I'll have some other crap to add at a later stage.
Any comments to add you can make here on the blog or else email directly to dwarfedfilmsinfo[at]gmail.com

-Shane


[Images from Google/images.com; Copyright belongs to respective owners]

Sunday, July 31, 2011

"To Shoot A Rurf" featured on 366WeirdMovies.com

Our 'out there' short film "To Shoot a Rurf" is featured on the website 366WeirdMovies.com.

We're proud to be featured on the site as it celebrates the weird and odd movies that we love so much - and 366WeirdMovies also happens to have the funniest and smartest reviews I have ever read.

Seriously! Read some of the write-ups for 'Manos the Hands of Faith' or 'Death Bed: The Bed that Eats' and you will literally wet your pants!

You can watch To Shoot a Rurf film here.

Wednesday, June 29, 2011

Nofilmschool.com's FREE DSLR Cinematography Guide


The website NoFilmSchool.com (I love that name) have a great FREE book resource covering digital SLR camera's for shooting movies.

It's available here: http://nofilmschool.com/dslr/

A simple, straightforward bit of writing that explains all you need to know about picking and using one of these for making a film.

Very useful if you are deciding on what camera to use when making a forthcoming action thriller feature film....

Tuesday, June 14, 2011

"Birth" - Watch the Short Film Online


You can watch our latest short film "BIRTH" on YouTube.

Click here to view BIRTH.


The film was directed by Shane Sheils and Paula Sheils and created using Blender 3D, Apophysis, After Effects .

The music was composed by Shane Sheils and Paula Sheils.

The movie was composited and edited using Sony Vegas Pro, Blender 3D and After Effects.


Click here to view BIRTH.

Monday, June 13, 2011

New Short Film "Birth"

Our latest short film "Birth" was completed recently.

We'll upload some images and possibly a lo-resolution version of the movie itself shortly.

This film is a audio/visual exploration of Birth and was created using various animation software such as Blender, After Effects, Apophysis and others.

The orcehstral score was composed by myself (Shane Sheils) and Paula Sheils.

Wednesday, November 17, 2010

"To Shoot A Rurf" - November Critic's Choice on MISHORTS


Sorry we haven't been updating in a (loooong) while, but we've been busy with other projects that have really eaten away with our time.

Anyway, here's some news;

"To Shoot A Rurf"
is one of four films chosen this month on the Mishorts.com website as part of the Critics Choice.

The film was made back in 2007 and was created using Blender 3D and other Open Source software programs.
Directed by Shane Sheils and Paula Sheils, it is one of the oddest movies you are ever likely to see!


From the MiShorts site:

Guest Critic: Michelle Thomas

Michelle Thomas (aka Coco Forsythe) sits on the advisory committee of the British Independent Film Awards and has been a FutureMovies editor and reviewer for the past five years. Her ‘proper’ job is in film marketing and although preferring indie/arthouse fare, she confesses to enjoying a bit of mindless entertainment now and then.


To Shoot A Rurf
An impressive noirish animation depicting the effects of long term drinking. If that sounds like some sort of Government Health Warning, its not; with black humour, original style and fantastic sound design, its miles from Drugs Are Bad, Mkay style messages. Set mainly in a gloomy backroom bar and the protagonist’s dingy flat, this is an extremely accomplished film, deftly creating a sinister atmosphere with its clever use of lighting and colour. A film for anyone who has ever regretted that last drink.

Friday, February 26, 2010

A Polish Winter Wins Best Short @ Athens Jewish Film Festival


Our Holocaust-themed animated short 'A Polish Winter' has won best short film at the 2010 Athens Jewish Film Festival, Georgia, USA.

Directed by Shane Sheils & Paula Sheils, A Polish Winter tells is a moving tribute to the children murdered in Nazi death camps in Poland.

Tuesday, December 15, 2009

Festival More news on "A Polish winter"


More news on "A Polish Winter" screenings at upcoming festivals:


It is showing at The Greater Phoenix jewish Film Festival, In Arizona, USA.


It is also showing in competition at the Derby City Film Festival, USA


You can download and watch "A Polish Winter" at this link

The file is in XVid Mpeg4 format and it's size is approximately 165MB.


"A Polish Winter " is a moving tribute to the Holocaust through the eyes of a child.

Monday, October 26, 2009

"A Polish Winter" Nominated for Blender Suzanne Award

Our Holocaust-themed short film "A Polish Winter" is nominated in the category of Best Film at this years Blender Suzanne Awards.

The Suzanne awards are the Blender Foundation's version of the Oscars, so we are very happy to be nominated.


Blender 3D is the software we used to create A Polish Winter.

Thursday, October 08, 2009

A Polish Winter - Screenings Update


"A Polish Winter" is playing at the Bangkok International Film Festival shortly and also screened at the Portobello Film Festival London a few weeks ago.

Thursday, June 25, 2009

Sci-Fi Short - Location Design images


Here are some images of the location that the Sci-Fi 3D animated short is set in.

You can see that it's a grimy, dark spaceport room with a bizarre television set as the focal point!

All models were created using Blender 3D and all textures were made using The Gimp.

Click on the images to view full-sized.

More images to follow soon....

Tuesday, June 16, 2009

Link - Ohio Blender User

Here is a link to a filmmaker and special FX guy from Cleveland, Ohio who's been using Blender.

http://clevelandfx.blogspot.com/

I'm always interested in hearing from other Blender 3D users around the World and finding out what techniques and work they're doing with Blender.

So, if you have some tricks up your sleeve or are doing some interesting stuff with Bleneder feel fre to get in touch and i'll try and put up a link to your website/blog.


Shane
Dwarfed Films

Adding Camera Movement to Video Footage in Blender 3D

Adding Camera Movement to Video Footage in Blender 3D


For our latest short film I wanted to add very subtle camera movements to simulate a kind of hand-held feel to the action.
There are three ways I could go about this:

The first would be to animate the camera jittering about while doing the animation.
This would lead to longer rendering times of the backgrounds especially in scenes requiring lots of ray tracing and mirrored reflections.

The second way would be to render the scenes with a static camera and then import these sequences into Blender Sequence editor and apply the ‘Jitter’ plugin.
This would render faster but the jitter not very convincing.

The final way would be to render the scenes with a static camera and then import them back into Blender, project the images onto a 3D card which we can then add (limited) camera movement on the X and Y axis, as well as zoom.


SO this is the technique that I’m gonna use.


Ok, what’s the purpose/benefits of doing this?

Well, firstly, this method involves putting an image onto a plane (or any shape – but mostly a flat plane) and then using a 3D camera to perform simple pans, rotations and zooms on this image.
By doing this you can achieve some simple camera effects like handheld jitter.
Its not 100% accurate but it will suit some scenario’s and it is a great little way to do some useful cropping and post-processing on pre-recorded/animated footage.


It’s really easy to set up a 3D viewing plane:

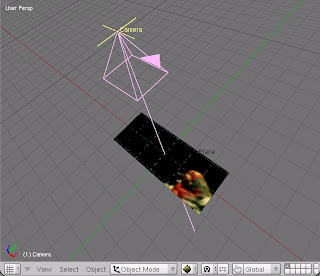
All you need is a Camera and a Mesh Plane.
When inserting the Camera and the Plane, press ALT+R and then ALT+G to clear their rotation and location co-ordinates.

Then drag the Camera back on the Z-axis far enough so that you can see the Plane in the Camera View. Press CTRL+A to clear rotation/location/scale.

Now press the ‘0’ key on your keyboard to enter 3D view from the camera’s perspective.

Now, I’m working in this instance with footage that has dimensions of 720 X 300 pixels.
(For the actual film I will be using dimensions of 900 X 432 pixels but lets just use 720 X 300 for this example)

In the Render Buttons panel enter 720 X 300.


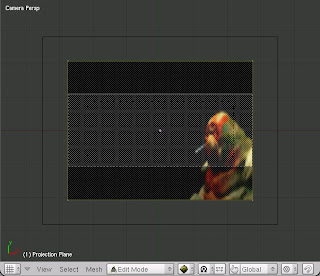
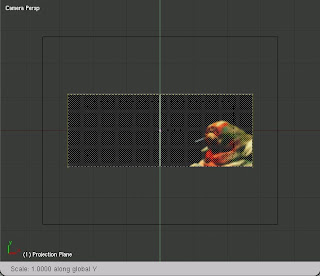
Now scale your mesh plane in Edit Mode so that it fits perfectly inside the camera view.


Fig 1: The image before being scaled to fit the camera view.


Fig 2: The image scaled to fit inside the Camera view accurately.


Enter UV edit mode and select all the vertices and Unwrap using “Project form View Bounds”. (It helps if you select a single still image from your image sequence and import it separately into the UV window so that it allows you to visually line up your plane to the correct scale)

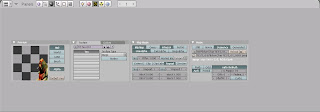
Go to the Material buttons tab and add a new material to the plane.
Go to the Texture buttons and add a new texture to the plane – select an image sequence or movie. Enter the amount of frames you want to use in the box to shows up.


Go back to Material buttons and select Shadeless (and TEX FACE if you want).
In ‘MAP INPUT’ choose ‘UV’.

See the enclosed image for settings (you may note that I was using an image sequence with an Alpha channel).


Go to the render buttons panel and enter the output frame size you wanna use.
In this instance it’s 720 X 576 (PAL).
You will notice that the top and bottom of the 3D viewport fame has increased.
This is because the frame size I choose before (720 X 300) was intended to give a ‘letterboxed’ image.

Make sure Ambient Occlusion is turned off when rendering or else you will end up with the sky showing through in the background and increased render times.

Now that you are all set up, you can move the Camera about in 3D space and animate it using IPO’s.
You can zoom in on selected areas, or do pans and rotations.
Remember that when doing pans and rotations you need to be zoomed in slightly (or a lot!) or else you will end up with a strange looking cropped image.
This is why I rendered my initial sequences of the film as larger than my intended output size – 900 X 432 instead of 720 X 576.
This means that I can zoom in for camera movements without the image getting blocky or pixellated.
Add ‘jitter’ camera movements that zoom in and out and pan from side to side and up/down using IPO curves.
Be careful not to over do it or to add too much movement as it will become disorientating – and look a bit crap! Subtle moves will help add to the general feel of your movie.


Experiment with this technique and see what else you can come up with!


Shane Dwarfed Films

Wednesday, June 10, 2009

New Image from lender 3D animated Sci-Fi short


Here's another image showing the television from our latest short film.

Keep watching this site for further updates, images and news!

Monday, June 01, 2009

HP Printer will not install on Windows Vista? - Heres what to do


Having a problem trying to install a Hewlett Packard printer onto your Windows Vista PC/Laptop?

Does your install stall after failing to locate the drivers?

Well, I sympathize with you becasue the other night I nearly went crazy trying to get a damn printer to install on a Vista machine!

The computer would not recognize the new printer despite many, many attempts.
I tried re-installing the software multiple times to no avail.

I searched the Internet for solutions and went to the HP website for help.
I emailed HP for assistance - no reply yet.
I went to the HP website and downloaded the driver software again - even though I had the brand new install CD!

Well, it doesn't matter anymore because I found the solution myself!

Here was the problem (in case anyone else out there encounters similar):
After installing the software and drivers on the enclosed CD, the set-up screen then asked me
to connect the device to the machine using the USB cable. Then I was asked to search for the driver - the first option was to search the install CD for these drivers.
After a few moments the screen then said that the drivers could not be found.

Crap!

THE SOLUTION:

The solution was actually very easy!
I unplugged the USB cable and then replugged it again, prompting the set-up screen to ask me to locate the drivers for the printer.
Instead of selecting 'Search install CD', I choose to manually search for the drivers and redirected the computer to search the path: "c:\windows32\" or just "c:\windows\" - in other words, telling the computer to search your local hard drive for the files.

After a few moments the drivers were located and the machine installed correctly!
If you come across this problem, I hope this helps you out.


Now, how the hell did HP allow such a simple but annoying issue to crop up?
Surely they should've sorted a basic error like this before launhcing equipment and software.


I wish software/hardware manufacturers would get their act together and not release software until it has been properly screened, tested and checked.

Irritating nonsense like these install issues are the sort of thing that puts consumers off using certain manufacturers products in the future....

Thursday, May 21, 2009

Blender Sci-Fi Short - Vicious Bug Character


Here is the re-designed bug character from our latest short 3D animated film.

Click on the image to view larger.

The previous model I created for the film just didn't feel right so I did a complete overhaul and redesigned this one yesterday then completed the texturing and rigging late last night.

It's a nasty-looking winged bug that I feel fits perfectly with the style of the film much more than what we originally had.

The lead character - which you can see in a previous post - is a slob-like, chain smoking, fat, lazy, bum!
The razor-fanged leech-shaped fly fits the whole stylistic design we want the film to have.


I mentioned in an earlier post about the lighting and how important it is to the look and feel of this short.
The atmosphere really depends on having the correct lighting setups for the particular scene tone.
Get it wrong and you run the risk of messing up movie, so I'm spending a lot of time working out the correct lighting setups and how they will work with shot angles and how they basically make the character models look.
Bad lighting can destroy a good model!

Keep tuned for more updates on this film which is being made using Blender 3D and other open source/freeware software.

Monday, May 18, 2009

A Polish Winter showing in Geauga Ohio film festival


Hi there!


Our short 3D animated film "A Polish Winter" is screening at the inaugural
Geauga Film Festival .


Heres the press release from the festival:


"

....Geaugafilm.org, in cooperation with the Geauga Lyric Theater Guild, has selected the films for their inaugaual film festival June 9-14.

“We had over 70 films entered from all over the world” stated Greg Pribulsky, vice president of the Guild and committee chair for the festival. “It is great to see so many talent filmmakers wanting to show their work in our historic theater.”

A total of 44 films (both short and feature length) will be shown over the 6 day event starting on June 9-14. Films from as far away as Meath, Ireland, Los Angeles, California and Palm Bay, Florida were entered in this first film festival for the Geauga Lyric Theater organization.

“We had films from all over the US, Canada and even Ireland entered.” said Pribulsky. “I really am amazed at the quality of the work..."


We are delighted to have the film screen at this film festival which takes place in Ohio, USA.

A Polish Winter was written/directed/produced/animated/music composed by Shane Sheils and Paula Sheils.
It tells the story of a young boy who discovers an abandoned train cattle carriage in Eastern Europe. Upon entering inside and finding a discarded doll, memories are triggered of the Holocaust and the murder of countless children in Nazi death camps in occupied Poland.

The film was made using mostly Open Source software such as The Gimp, Blender 3d and Audacity.

For further information, you can view the making of this film on these websites: